
Google Cloud SQL for PostgreSQL Setup Guide
Google Cloud SQL for PostgreSQL Setup Guide
Prerequisites
To connect your Google Cloud SQL for PostgreSQL database to Go Fig, you need:
- PostgreSQL version 9.6 - 17
- Your database's port (usually
5432) - TLS enabled on your database, if you choose to connect directly to Go Fig. Follow Google Cloud's TLS setup instructions to enable TLS on your database.
Setup instructions
1. Create a dedicated user for Go Fig's exclusive use
- Select the database from the list of Instances
- From the left menu, select Cloud SQL Studio and log into your database instance
- From within Cloud SQL Studio, create the dedicated user for Go Fig. Replace
<username>andpasswordwith a username and password of your choice.
CREATE USER <username> PASSWORD 'password';
- Grant this user read-only access to all tables by running the following commands. To grant access to a schema other than PostgreSQL's default
publicschema, replacepublicwith the schema name.
GRANT USAGE ON SCHEMA "public" TO <username>;
GRANT SELECT ON ALL TABLES IN SCHEMA "public" TO <username>;
ALTER DEFAULT PRIVILEGES IN SCHEMA "public" GRANT SELECT ON TABLES TO <username>;
NOTE: The last command makes sure that any future tables will be accessible to Go Fig.
If you want to grant access to multiple schemas, you must run these three commands for each schema.
2. Create read replica (Recommended)
Create a read replica for Go Fig's exclusive use. Using a read replica allows Go Fig to integrate your data without putting unnecessary load on or interrupting the queries running on your primary server. We recommend that you connect a read replica to Go Fig, but it's not required.
If you already have a read replica or want to connect Go Fig to your primary database, skip ahead to Step 3
- From the left menu in Google Cloud SQL, select Replicas
- Click Create Replica
- On the Create Replica page, enter an Instance ID for the replica.

- Click Create Replica. It will take a few minutes for the read replica to be created.
3. Allow Go Fig to access your database
Restrict access to SSL Connections only
- From the left menu in Google Cloud SQL, navigate to the database instance you want to connect with Go Fig. This will either be your original database or the replica (if you completed Step 2)
- In the left menu, navigate to the Connections tab.
- Go to the Security tab
- Under Manage SSL Mode, select "Allow only SSL connections"

Allowlist IP Addresses
- In the left menu, navigate to the Networking tab.
- In the Authorized networks section, select Add A Network
- Enter "Go Fig" in the name and the our partner Airbyte's IP Addresses:
- 34.106.109.131
- 34.106.196.165
- 34.106.60.246
- 34.106.229.69
- 34.106.127.139
- 34.106.218.58
- 34.106.115.240
- 34.106.225.141
NOTE: You will need to do this for each of Airbyte's IP addresses. There are 8 in total.
- Once you've added all 8 networks, click Save. It will take a few minutes for the database to be updated with the new settings.

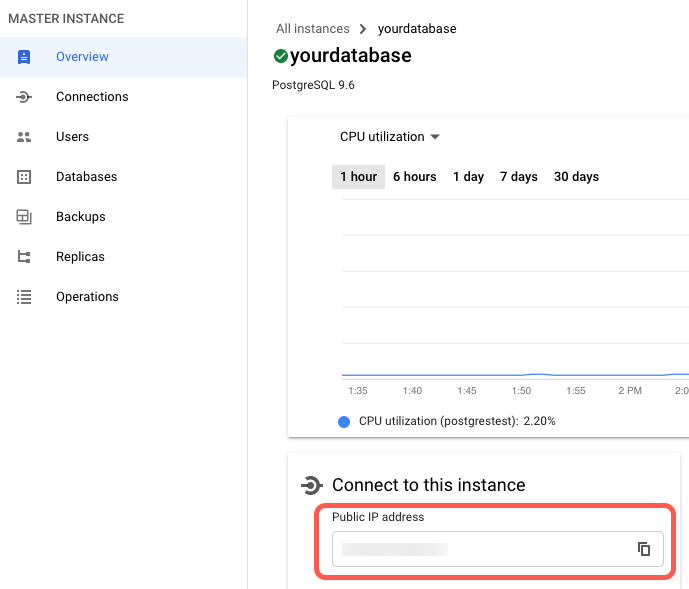
Find Your IP Addresses
- In the left menu, navigate to the Overview tab.
- In the Connect to this instance section, find your database's public IP address and make a note of it. You will need it to configure Go Fig.
Finish Go Fig configuration
- In the PostgreSQL Connection Setup form, enter the Collection name of your choice.
- Select the Sync timeframe from the drop down options. This allows you to set how far back you want to sync data from PostgreSQL.
- Enter the Host or IP Address that you took note of above
- Enter the Port number. This defaults to
5432and you can find this in the Overview tab from your selected Cloud SQL instance
- Enter the Database name. This is not the name of the instance, but of the database itself
- List out all the schema(s) you want to sync tables from. If you leave it empty, it will default to
public. If you choose to list multiple schemas, they must be separated by commas (for example,public, another_schema).
- Type in the Username and Password for the dedicated user you created in Step 1
- Click on the Confirm Firewall Access toggle to confirm all 8 networks were added in Step 3
- Click Connect. Go Fig will take it from here and sync your data from your Postgres database
Note
Go Fig partners with Airbyte to manage connections with your external accounts and sync data to Go Fig. Go Fig does not store any information provided in the Connection Setup forms. For more information on how Airbyte works, see their documentation here.
Updated on: 05/30/2025
Thank you!